
Step-by-step guide for designing Lean Experiments
Designing sound experiments is critical to creating valid and reusable knowledge. This guide will help you achieve that.
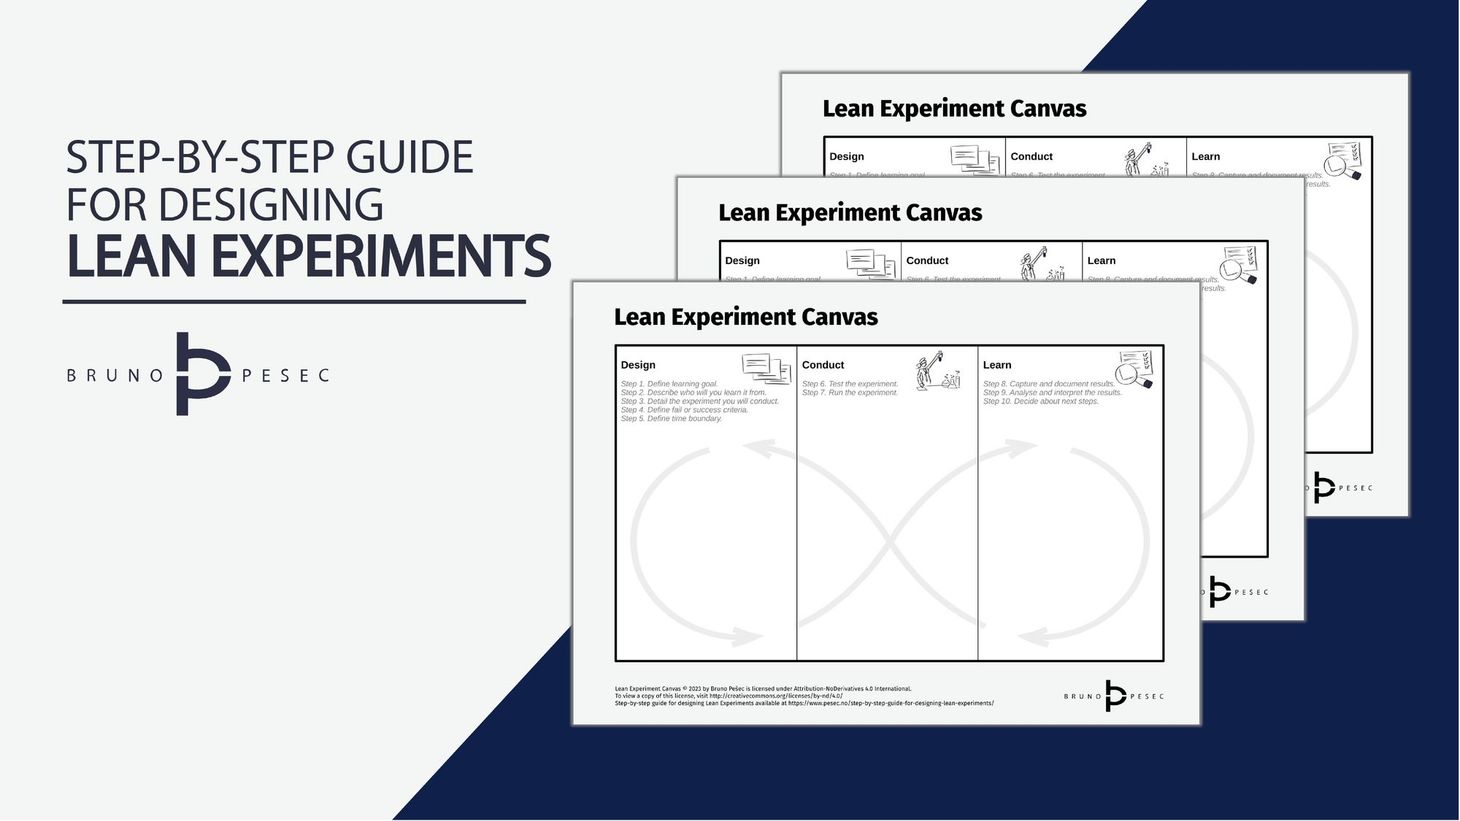
Table of Contents
Why should I care about experimentation?
For entrepreneurs it is about measuring progress through amount of validated learning created to date.
For those working with innovation in established organisation it is about creating reusable knowledge and organisational value.
Designing sound experiments is critical to creating valid and reusable knowledge.
If you search online for design of experiments you will most likely find resources from fields of applied statistics or experimental psychology.
Although both are insanely interesting, they require substantial investment of time.
But you want to learn now, and you want to run an experiment tomorrow.
Well, then this is the guide for you.
This step by step guide is a product of a decade of experience, cut down to the very minimum you need to design an experiment to learn about almost anything within business context.
I've been designing experiments since my university days—I've even written an algorithm for specific experimental design involving mixtures.
Since then I've deployed various experimental designs, from quantitative, to qualitative, to mixed models.
What I've come to realise is that having a structured way to probe how we see the world and maximising learning is the most important part, and not the technical stuff and slavish adherence.
That realisation was pivotal moment in how I coach others to design and conduct experiments efficiently.
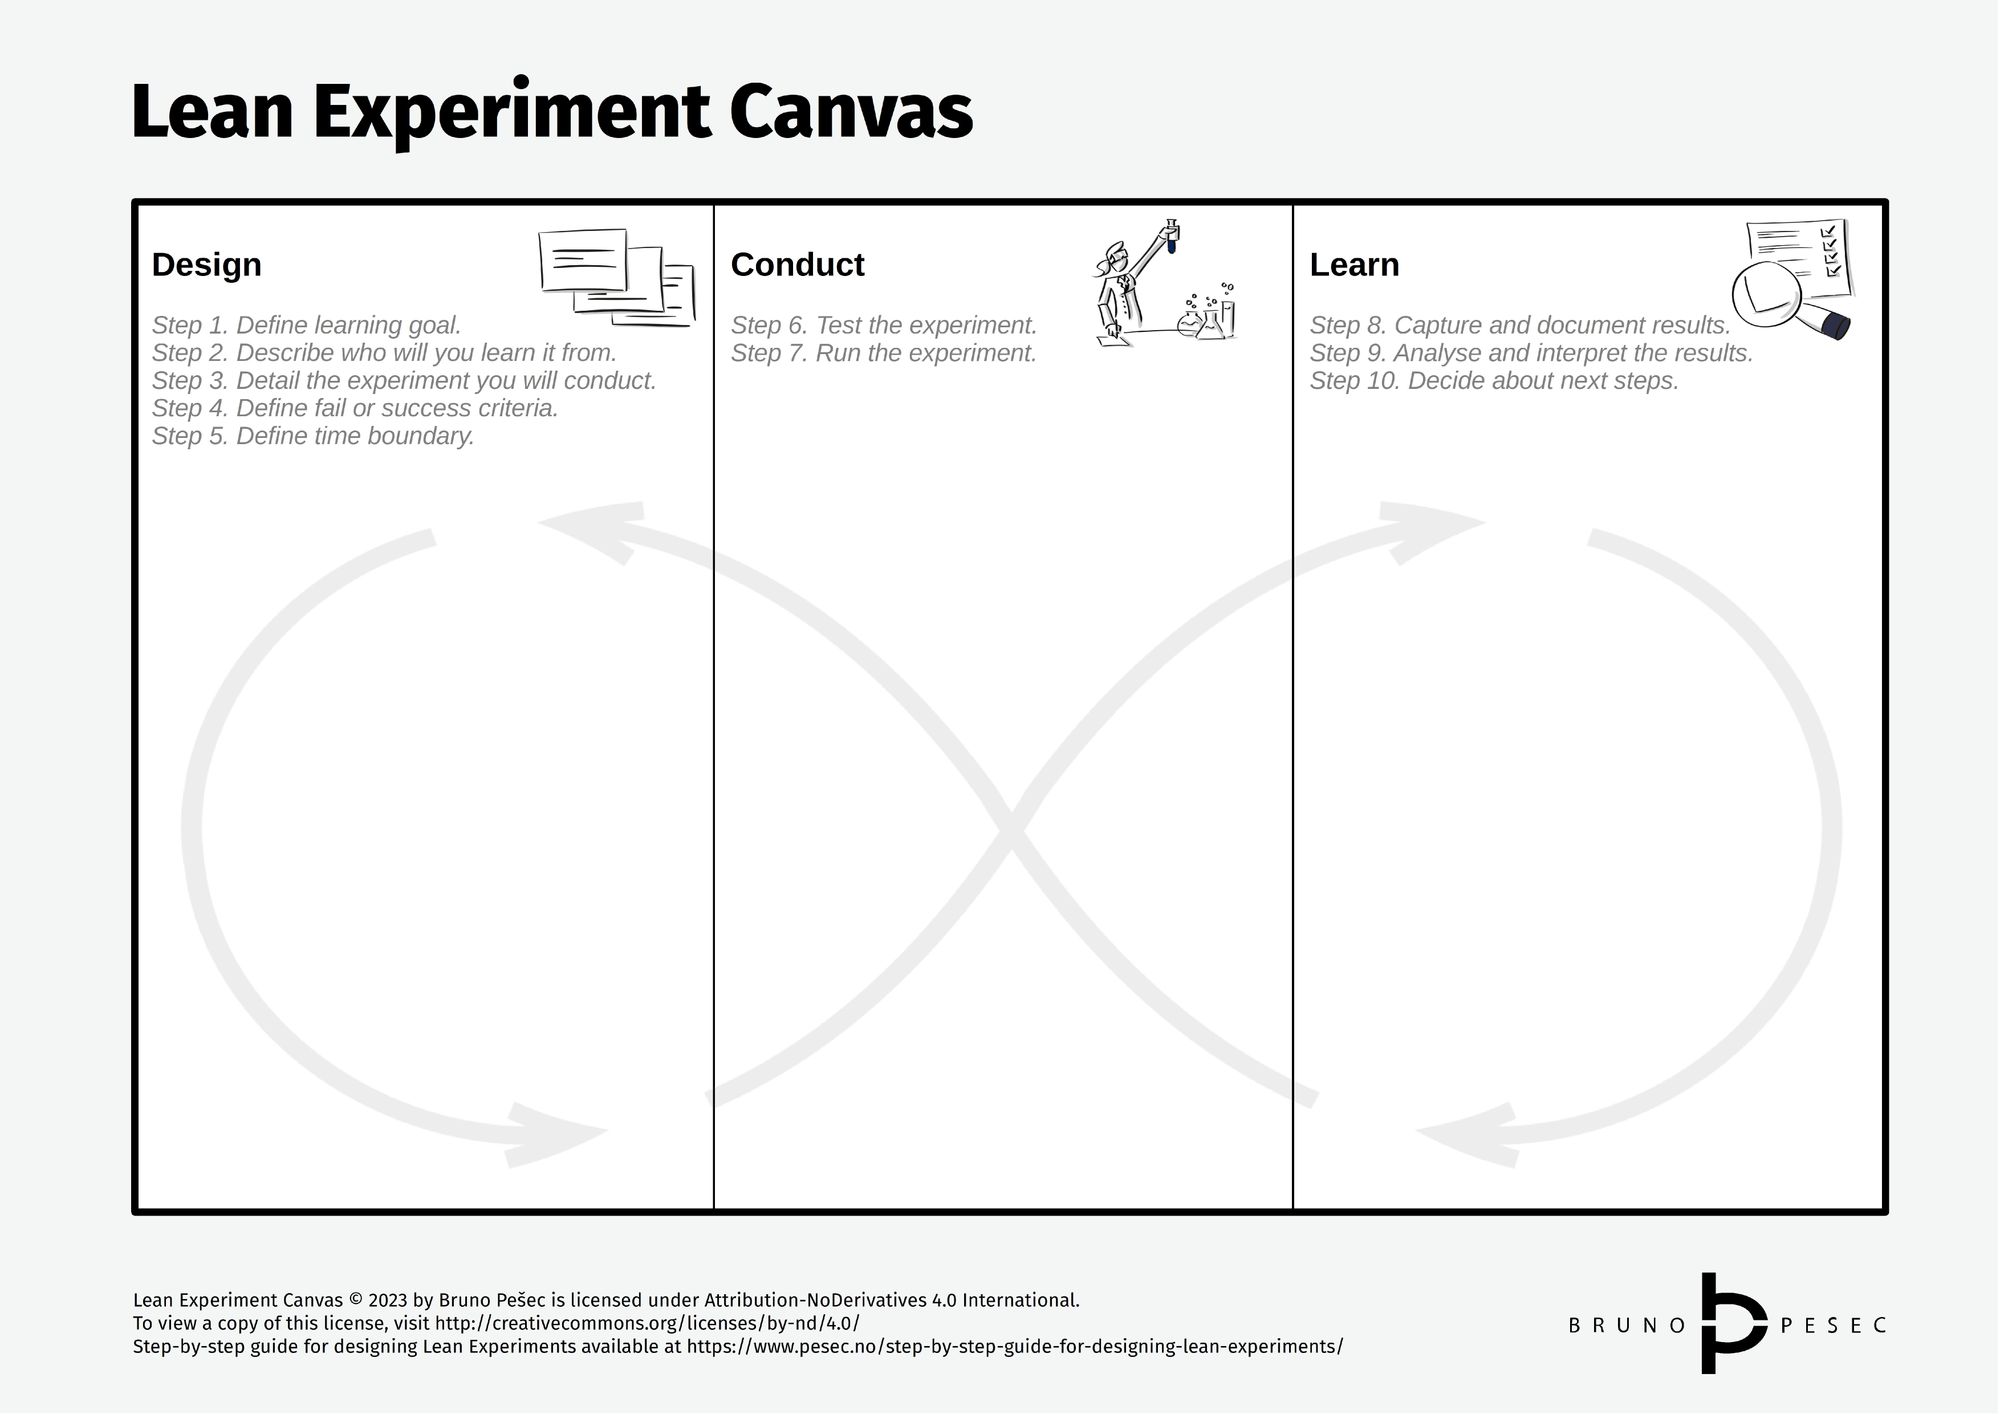
This guide consists of three phases and ten steps:
- Phase I: Design the experiment.
Step 1. Define learning goal.
Step 2. Describe who will you learn it from.
Step 3. Detail the experiment you will conduct.
Step 4. Define fail or success criteria.
Step 5. Define time boundary.
- Phase II: Conduct the experiment.
Step 6. Test the experiment.
Step 7. Run the experiment.
- Phase III: Learn from the experiment.
Step 8. Capture and document results.
Step 9. Analyse and interpret the results.
Step 10. Decide about next steps.
Since this guide focuses specifically on designing experiments for maximising learning you can couple it with any other tool you are using.
Phase I: Design the experiment
Step 1. Define learning goal.
What do we want to learn?
What are we assuming?
What is the research objective or falsifiable hypothesis?
Every good experiment begins with a clearly defined learning goal.
When we are clear on what is it we wish to learn, then we can start figuring how to learn that.
"We want to learn if the customer will care about this enough to switch their supplier" is a great learning goal. It is crisp, concise, and solid base for formulating assumptions and hypotheses.
Assumptions are questioned, hypotheses are tested.
You can translate your assumption into a falsifiable hypothesis by restating it with numbers.
I suggest using one of the following two formats:
- Hypothesis format from The Real Startup Book:
The change - the metric - the impact - the timeframe.
Example:
If we add a lock icon next to the credit card information, the completion of the checkout process will increase by 15% in 3 months.
-
XYZ format by Alberto Savoia:
At least X% of Y will Z.
Example:
At least 15% of dog owners will add a six-pack of beer for dogs for $4 when they buy dog food.
If you find it difficult to write a falsifiable hypotheses that might be a signal that you should do more thinking about your learning goal and underlying assumptions.
If you have multiple falsifiable hypotheses for a single assumption, then I suggest designing an experiment for each hypothesis. That is usually cheaper and faster than designing a single experiment to test multiple hypotheses.
Step 2. Describe who will you learn it from.
Who are you going to learn it from?
Describe in detail the customer group you will run this experiment with.
Traditional way of describing them is using demographic and psychographic data. Examples of former are age, gender, occupation, geolocation, income, education, and so on. Examples of latter are personality, values, opinions, attitudes, interests, and lifestyles.
If you can access both, cheaply and quickly, that's great. If not, do not despair, and build your understanding of your customer over time, with relentless research and experimentation.
In the lean experimentation, one of the following descriptors must be present:
- what is the problem this group has,
- what is the underserved need this group has, or
- what are critical jobs-to-be-done this group has.
Focus on these three above, and collect demographic and psychographic data along the way.
Notice that I wrote customer group. That is the most likely group you will be learning from, but not the only one. Depending on the maturity of your business model, other groups of interest might be partners, employees, shareholders, ecosystem participants, and local population.
All the people that match your description form theoretical population.
Those of them that you can get access to form study population.
Finally, those that you actually reach with your experiment or other form of research form your sample.
Technical term for the above is sampling.
You don't need to have a PhD in statistics to master it, but it does take some study and practice. Some considerations to be aware of:
- Random selection of sample participants (individuals) from your study population will give you more generalisable results.
- Selecting "first ten" on your list is not random selection.
- Random selection is more important for mature ideas, and when you have sample sizes above 500.
- If you cannot randomise your sample when testing an idea in early stages (before product market fit for example), make a note of it and proceed. Once you come to analysis and interpretation be sure to mention it. Your learning will still be valuable, but it might not be representative of the whole study population.
Doing a lot of experiments or large sample experiments with consistently poor sampling practices can be harmful, since you might be making decisions based on poor—or even worse, misleading—data and interpretations.
In organisations—including startups—it is beneficial if everybody involved with interpreting experiment results is acquainted with sampling basics. Decision makers included.
Step 3. Detail the experiment you will conduct.
How will you learn it?
How will the experiment be executed?
Write a step-by-step script—cookbook style—of how will you do the experiment.
It is easy to bungle up experiments with our interference, and that's why it is important to have the steps clearly written.
Easiest way to start is to look at existing experiment designs and use them as inspiration. Here are guides for some common designs:
- Customer discovery interviews (most commonly problem interview).
- Solution interviews.
- Comprehension testing.
- Smoke tests (most commonly with landing page or video).
- Concierge test.
- Wizard of Oz test.
- Surveys (How to Design and Analyze a Survey by Christopher Peters).
- Split or A/B testing (A/B Sensei by Rik Higham).
Reference materials you should have bookmarked:
- The Real Startup Book is a catalogue of various Lean Startup experiments.
- Experimentation Hub is a collection of free online tools for quantitative experimentation.
- Research Methods Knowledge Base covers the entire research process. Good time to consult it is if you are asking yourself Is my experiment good enough? or Can I trust my experiment?
Step 4. Define fail or success criteria.
What is the smallest response or result that would justify spending more time on this?
Defining fail or success criteria before running the experiment allows you to make less biased decision if you should persevere, pivot, or stop.
Here are three ways to define the fail or success criteria:
- Extrapolated from the business case. You can use elements of your revenue or profit formula. Alternatively, you can use TAM-SAM-SOM analysis.
- Based on the industry benchmark. You can use data like the industry average, market leaders performance, and performance of your competitors and existing alternatives.
- Hippocratic oath. You can use your current performance as a minimum success criteria. In other words, the change you are experimenting with should produce better results (response) than the current solution.
If you have been working on your idea for more than eight weeks and cannot use any of the above, that is a signal that something is wrong.
For nascent and early stage ideas, a fallback criterion you can use is:
What is the smallest response or result that would justify spending more time on this?
As you might have observed, I keep writing "fail or success criteria." That's because they are different sides of the same coin, albeit with slightly different implications.
In practice, the difference would look like this:
- Fail criterion: Less than 20% of interviewees spent more than $600 on painting their doors in the last three months.
- Success criterion: More than 20% of interviewees spent more than $600 on painting their doors in the last three months.
Setting fail criteria is more in tune with the scientific method. Setting success criteria usually seems more optimistic and natural. I suggest you always strive for fail criteria, and go for success criteria only if you have a good reason (e.g. organisational culture where failure is tabu).
And remember that regardless of which you opt for—it always needs to be connected to the learning goal at hand. Everything starts and finishes with what do you want to learn in order to make this idea a great success.
Step 5. Define time boundary.
How long will this take?
Time-boxing your lean experiments is beneficial for a multitude of reasons:
- It gives you a specific date on which you have to stop, process the data, and make a decision.
- You are almost always better off by running multiple small experiments, instead of a few big ones.
- It challenges you to consider activities that will take less time and effort to generate the same learning (since you define the learning goal in the first step).
- It gives you focus and cadence. Depending on the type of the experiment, you will either be fully focused on conducting it, or you will be waiting for results. In the former case you have a clear set of expectations, and in the latter you have peace of mind while doing daily tasks.
- It provides a feeling of satisfaction, progress, and closure. You should always be learning, testing, and adjusting. But this one experiment is done and closed. Celebrate and move on.
- It reduces the likelihood of confounding. The longer the experiment runs, the more likely are you to introduce factors that will make data less reliable and trustworthy.
Bottom-line, time-boxing allows you to achieve your learning goals faster.
Hence, write down for how long is the experiment going to be run.
Length should be based on the sample size and experiment type.
If your experiment will take more than two weeks, then challenge yourself and see if you can design an experiment with the same learning goal that would take less time.
Alternative boundary condition can be reaching desired sample size.
For example, if you defined that your experiment will be administered to 100 participants, then you can stop once they have been reached.
Phase II: Conduct the experiment
Step 6. Test the experiment.
Are there any showstoppers?
Do questions make sense?
Is it possible to do it within the time frame you allotted?
You are ready to go live! Or are you?
Measure twice, cut once, is an apt proverb for this case. To be more direct, it's better to check the experiment design twice, than to run it and quickly find out something is amiss.
Checking your experiment design isn't about getting an early insight into whatever you've put forward as your learning goal, but rather about understanding if it run as intended—mechanically speaking.
Let's say that you want to learn how would your existing customer base react to a new product. You devise a lean experiment that would basically send a new offer to 500 customers, and a regular offer to other 500 customers. You decide to measure open and conversion (i.e. a purchase) rates to determine if it's a success or failure.
Checking in the above example would refer to:
- making sure that the right people will receive the email (e.g. existing customers that have done at least one purchase, a single customer doesn't receive both offers, etc),
- making sure that all links works as intended (e.g. tracking parameters, directed at correct product pages, etc), and
- making sure that everybody in the team know how the experiment will be executed (e.g. what happens first, who sends out the emails, how to terminate the experiment if necessary, etc).
In essence, you want to check if your experiment will produce data as intended, not which data will it produce. You will analyse the latter once the experiment has been been concluded.
Mistakes happen, but it's better to catch them early. That is especially true for larger companies that have recognisable brands, where even small mistakes can harm their reputation and have financial repercussions.
So, make sure to test your lean experiment at least twice before running it.
If there are others doing the experiment with you, make sure they understand the experiment script and the learning goal as well.
Again, this step is not about getting an early dip into potential outcome.
Don't bias yourself unnecessarily.
Step 7. Run the experiment.
Go and do it!
Resist the urge to interfere and deviate from your experiment script too much.
Document any deviations, so you are aware of them during analysis and interpretation of results.
Discipline pays off in the long run.
Phase III: Learn from the experiment

Step 8. Capture and document results.
Write the numerical value(s) of the result and objective observations you made during the experiment.
All the data generated from the experiment should be captured, ideally in raw form. Try to keep it as "pure" as possible. No interpretations, no fluff.
If there are numbers—just write them down as they are. If they are observations and conversations, just write down what you've literately seen and heard, not what you think you've seen or heard.
Here are some examples:
7/11 interviewees ranked problem #2 as the top issue.
7% (432/6177) of website visitors left their email.
21% (23/111) of commuters purchased the £17 milkshake with thin straw.
Some examples of objective observations:
On question 7 customer changed posture, crossing arms, leaning backwards, and gazing to the right for two seconds before answering.
During the interview interviewee's boss was walking in the background. Interviewee could see him through the windowed wall of the meeting room. Although meeting rooms are claimed to be soundproof, it is possible to hear muffled voices if you are by the doors.
When we laid down six cards with problem statements customer reached out for card #3 the moment we placed it on the desk.
Capturing all data in its raw form will allow you to re-analyse and re-interpret it later, or in different contexts, if needed.
Resist the urge to include you interpretations in this step.
Step 9. Analyse and interpret the results.
Reflect on what did you learn, and write down your interpretation of the experiment result.
This is the moment you are creating validated learning.
Now is the time to analyse the quantitative data, if you collected any.
You don't need a PhD in statistics to do some exploratory data analysis (a fancy term for looking at data in a spreadsheet software), chart few basic plots (e.g. bar chart and scatter-plot), and calculate basic descriptive statistics (mean, median, mode, standard deviation, variance minimum and maximum variables, kurtosis, and skewness; all available in standard spreadsheet software).
Remember, you might not have to do any of that if you collected very simple quantitative data like "x out of n said/did."
Next step is to interpret the data.
This is the most important step, as this is where you combine the data you've collected with your knowledge and lived experience, from your specific context and environment.
Think of it as going on a learning adventure, narrating your own story. In the beginning you had a set of assumptions and a learning goal, then you went on a journey and collected data, and now you are making sense out of it; all of that in service of making an informed decision on how to move forward.
Transform into Dora the Explorer or The Grand Inquisitor, whichever imagery you prefer, and ask the following:
- What do the numbers and observations mean?
- If they are below what you expected, why?
- If they are above what you expected, why?
- How do the findings relate to the learning goal?
- What was clarified?
- What was not clarified?
- What new facts or uncertainties have surfaced?
- Has there been anything you haven't expected at all?
- How does this new knowledge relate to what you currently know?
- What implications does this new knowledge have for the future?
Be specific and write in full sentences. That will make it easy to reuse the knowledge gained from this experiment.
Organisations don't learn, people do. You might have learned a great amount from running this specific experiment, but unless you document all of the above it will be nothing but transient knowledge.
It will perish as quickly as it came. This is a particularly important point for large companies, as they can increase their experimentation ROI simply by properly documenting and disseminating their learning
Step 10. Decide about next steps.
Write down the decision you made after this experiment.
Specific, actionable next step.
Pivot? Where to, why, and how?
Persevere? More experiments? If so, which one and what for? If not, what activities, when, by whom, and by what time?
Perish, perhaps? There is no shame in deciding to stop exploring certain opportunities or leads, if it is backed by your findings.
Once you have written down your next action, take a moment to reflect upon the whole experiment.
Read it in reverse order, from the last to first step.
Then read it in proper order.
Does the decision you are proposing make sense? Is everything logically connected?
Have you noticed any logical fallacies or cognitive biases?
Give it to a colleague, and ask them to do the same.
If anything pops up then revisit steps 9 and 10.
Where to next?
Lean experimentation is a great way to de-risk innovative and entrepreneurial ventures. It offers us a way to systematically test our assumptions, generate trustworthy insights, and make better decisions.
Every legendary boxing match ends with an epic punch to the chin.
But that is merely a culmination of rounds upon rounds of combinations, tests, and exchanges. Great boxers maintain distance and throw quick jab-hooks to test and wear down their opponent.
Adapt the same mentality in your experimentation efforts. Identify the key assumptions of your business idea, and then wear them down with one-two punch experiments. Endurance matters!
Use the guide to design several experiments. It takes seven to nine experiments before you won't need the guide, except when you get stuck or need some inspiration.
Suggested for your further development:
- Creating reusable knowledge: how to design effective experiments. Innovation teams can generate value in several ways, and creating reusable knowledge is one easy way to do so. In this webinar I go through all the steps outlined above.
- Visual tools for experimentation and innovation accounting. In this post I explain three proven tools for visual overview of experiments, understanding progress, and innovation accounting.
- How to prioritise insight rapidly? You've learned so much, and now have a question - what to do next? Here is a three step process for going from insight to action in 40 minutes.
- The Business Model Canvas Explained. A popular tool for visual inquiry of business models. Since it is often filled with assumptions, it is important to pair it with a solid experimentation discipline.
If all of the above are not enough, then you might have to study some more challenging reading or consider getting professional help. Following two books should be available at your local university library:
- The SAGE Handbook of Qualitative Research. 2nd edition can be borrowed online for free.
- Design and Analysis of Experiments by Douglas C. Montgomery. You can borrow online an old and vandalised copy for free.
Finally, you can download the Lean Experiment Canvas here:
In the future I will update this section with more resources, including templates and checklists. Let me know what's most challenging for you and your team so I can prioritise better.
Step-by-step guide for designing Lean Experiments by Bruno Pešec is licensed under a Creative Commons Attribution-NoDerivatives 4.0 International License.
Based on a work at https://www.pesec.no/step-by-step-guide-for-designing-lean-experiments.
In other words, you can republish, and link to this guide, even commercially, as long as you provide attribution, and don't change it. If in doubt send me an email and we'll work it out.

Bruno Unfiltered
Subscribe to get the latest posts delivered right to your inbox. No spam. Only Bruno.

